Shapes and Layers
Containers
Group
A Group shape is a shape that contains other shapes.
It can define transformations and opacity for the contained group.
Editing
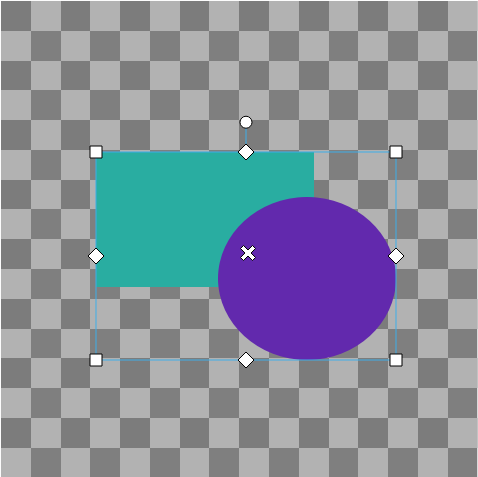
When a group is selected and editable, there some handles around its bounding box that allow editing of various properties:
The X-shaped handle in the middle allows you to change the anchor point around which other transformations are performed.
The Circle on the top allows you to rotate the group.
Holding Ctrl while dragging it will snap the rotation to increments of 15 degrees.
The Squares on the corners change X and Y scale at the same time.
The Diamonds on the edges change scale for one component at the time.
Holding Ctrl while dragging them will preserve the aspect ratio.
Layer
A Layer is a special kind of group with a couple extra properties.
Top level layers can have other top-level layers set as their parents, inheriting their parent's transformations, this allows some more advanced layouts for example you could have two layers with the same parent layer and a third unrelated layer between them. This is not possible with plain group shapes.
Precomposition Layer
A precomposition layer shows the contents of a precomposition.
You can create these by selecting the layers you want to precompose and selecting Precompose Selection from the Layer menu.
This thill move the selection to a new composition and replace it with a new Precomposition Layer.
If you already have precompositions set up, you can create them with Layer > New > Composition.
If you double click on these layers, Glaxnimate will show you the composition they represent. You can also switch between composition with the tab bar that appears when you add the first precomposition.
In the timeline, you can drag the start point of these layers to change the time at which they start.
You can also drag the end, this will change their speed.
In the canvas (with the select tool active) they show similar controls as the ones described for Groups.
Shapes
These define the actual shapes to draw, but no styling information.
Rectangle
Editing
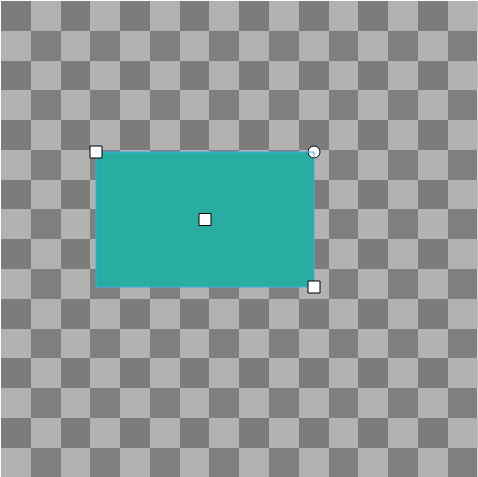
When a rectangle shape is being edited, it shows the following handles:
The Square handle in the middle shows the center of the rectangle, dragging it moves the rectangle around.
The Square handles at the corners allow changing the size of the rectangle.
Simply dragging one of them will keep the other in place and change where the center is
along with the size.
Holding Shift while dragging will keep the center in place and move the other corner
the opposite direction to the one being dragged.
Holding Ctrl will lock the handle in one of 3 possible directions:
- Moving horizontally from its starting position
- Moving vertically from its starting position
- Moving diagonally to keep the aspect ratio of the rectangle.
The final handle is a circle in the top right corner, that allows setting the "rounded" factor of the rectangle:
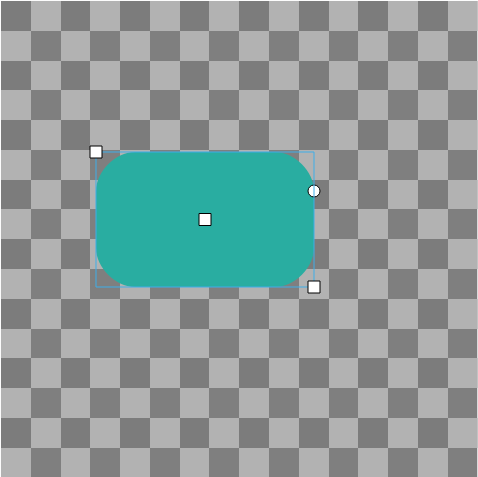
Ellipse
The handles here work the same as for Rectangle, minus the roundness one which is not present for ellipses.
Path
This represents an arbitrary bezier shape.
Editing
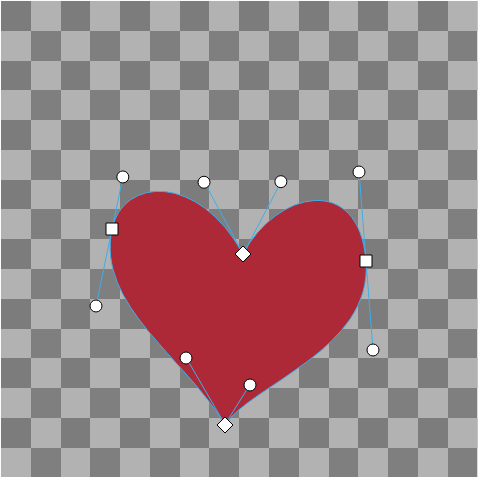
When editing a bezier path, you'll see two types of handles:
- Point handles: lay on the outline of the path, they come in different shapes.
- Tangent handles: they are connected to the point handles, they are always circles.
The way bezier curves work is that it creates a curve between two point, with the two other control points "pulling" on the shape to give its curvyness.
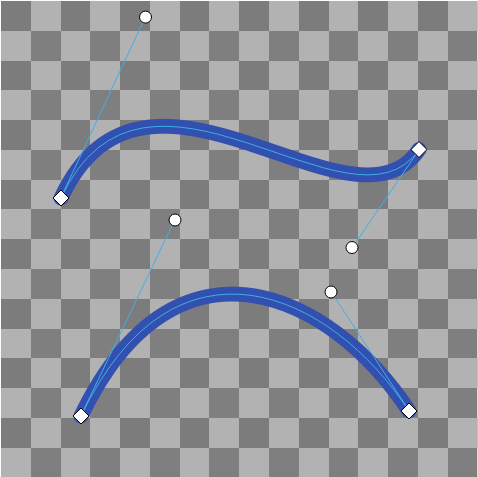
In the image above you can see a couple examples of bezier curves: they both have the starting and end points, and two other handles in between than pull the shape in different direction giving it its final shape.
The Point handles come in different types:
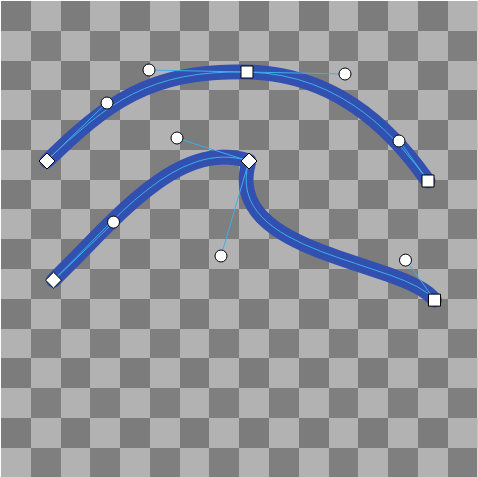
- Corner points appear as diamonds and leave the tangents free to roam
- Smooth points appear as squares and keep the same angle on both the tangents
- Symmetrical points appear as squares and keep both tangents on the same
PolyStar
This shape can be used to draw stars and regular polygons.
Editing
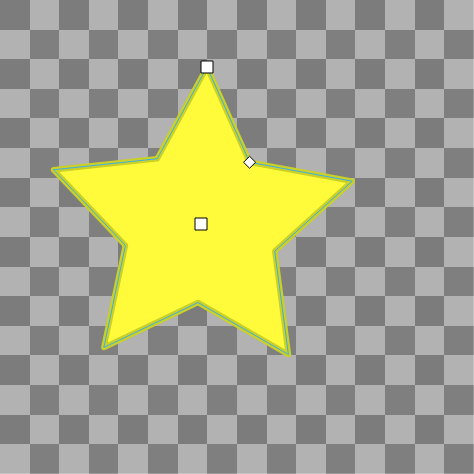
When a star shape is being edited, it shows the following handles:
The Square handle in the middle shows the center of the star, dragging it moves the star around.
The Square handle near the corner defines angle and radius for the star. Holding Ctrl while dragging it will change the radius without affecting the angle.
If the polystar is a star (as opposed to a regular polygon) there's an additional Diamond handle which is used to change the secondary radius of the star.
Interactions
Dragging on the point handles moves them, and their related tangents with them.
Ctrl-clicking on a point handle will cycle its type between Corner and Smooth.
Dragging on the tangents moves them (Smooth and Symmetrical nodes will cause the opposite tangent to be moved as well).
If you hold Ctrl while dragging a tangent handle, you can change its length while keeping its angle unchanged.
If you hold Shift while dragging a tangent handle, the other tangent will be moved to keep the angle between them constant.
Style Shapes
These add visual elements to other shapes.
Fill
Adds a fill color to the other shapes in the same group. This can be changed using the fill style view.
Stroke
Adds an outline to the other shapes in the same group. This can be changed using the stroke style view.
Shape Modifiers
Trim Path
The Trim Path modifier is a powerful tool that allows you to trim shapes in your animation. It allows you to specify the start and end points of the trimming, giving you control over how much of the path is visible in your animation.
There are no visible controls on the canvas but you can animate its properties in the timeline.
Repeater
The repeater allows you to multiply a shape and offset the transform of each copy.
Inflate / Deflate
This modifier inflates and deflates shapes like a balloon.
Offset Path
This modifier will offset the shape uniformly.
Zig Zag
Adds ripples along paths.
Miscellaneous
Image
An image shows a raster image file, this could be from an external file of with data embedded within the Glaxnimate file.
Editing
Image objects are edited the same way as Group shapes.
Context Menu
Besides the usual options, you have:
![]() Image
Image
Shows a submenu with a list of images loaded in this document.
![]() Embed
Embed
Copies the linked external image inside the Glaxnimate file.
![]() Open with External Application
Open with External Application
Opens that image with the default application for the given file type.
![]() From File...
From File...
Shows a file dialog to change the file being displayed by the image object.